Okay, now get your yarn and needles in hand, and pay attention. I'm going to give you some Decrease Rules.
Rule #1- The principal thing to remember about decreases of any kind is - and you can tattoo this on your forehead - Whichever stitch the right needle enters first when you are doing a decrease, is the stitch that ends up on top of the pile when the decrease is finished. Think about it - you are taking 2 or 3 stitches and making them into one. Only one stitch of those 2 or three can be on top, the others have to be in the middle or on the bottom. The stitch that the right needle enters first is the stitch that ends up on top. This decides which way the decrease leans.
Rule #2 - When slipping stitches as part of a decrease, the stitches are ALWAYS slipped as if to knit. Otherwise there is just no darned point in slipping them. You want to change the orientation of the stitch legs before you work the decrease in order to have the stitches not be twisted when the decrease is finished. Take a look back at the slipped stitches post here to see in detail why and how that looks.
Now, I am also going to tell you this- NO MATTER what your pattern says, if you are doing a knit decrease on the right hand edge of your fabric, do an SSK. I've seen many patterns that tell you to do a K2tog (Wrong!) or a K2tog tbl (not pretty unless you are working a twisted stitch pattern!). What you want is a decrease that will cause the stitches to lean from the outer right edge towards the center of your fabric, and SSK is the best way to make it happen.
Many times, pattern writers and editors will do what I call 'dumbing a pattern down'. In other words, they want to make it as simple as possible for as many knitters as possible. I don't ever hold with that theory. If you don't ever challenge knitters to learn something new by putting the proper technique into the pattern, then they will never learn something new. So tattoo this on your right hand - SSK - Slip, Slip, Knit
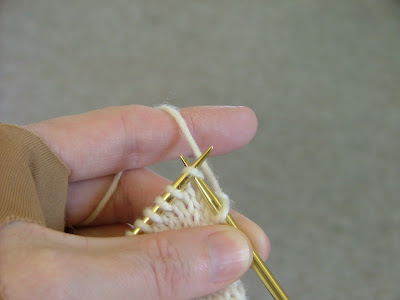
Slip one stitch as if to knit, slip a second stitch as if to knit

Put your left needle straight down their little throats and have it come out in the front. See how this puts your needles into knitting position? See how putting your right needle into the right stitch first will make that one land on top? Knit the two stitches together from this position.

On the left edge of your fabric, to get a decrease stitch that will lean towards the right - into the center of your fabric, simply knit two stitches together as if they were one stitch - K2tog. You could tattoo this on your left hand, if you are so inclined.

Here is how the finished SSK looks. Notice that the right stitch is on top, making the pair lean towards the left, away from the right edge. (second stitch in from the edge, 4th row down)

And here is how the K2tog looks. Notice that the left stitch - the one the right needle entered first - is on top and the stitch leans towards the right. (second stitch in from the edge, 3rd row down)

Now there are a couple of other ways to get a left-leaning decrease aside from the SSK. The first one here is a bit more old-fashioned, you'll see it more in older patterns. This is a Sl1, K1, psso. Slip one stitch as if to knit, knit the next stitch.

With the tip of your left needle, pick up the slipped stitch - the second one in - on your right needle, lift it up and over the knitted stitch, and drop it off the needle, just as you do when you are binding off. Slip 1, Knit 1, Pass Slipped Stitch Over. Because that dropped off stitch was slipped without being worked, it is slightly longer than the stitches around it, and so the result is less elegant.

The other left leaning decrease is a K2tog tbl, or Knit 2 Together Through the Back of the Loop. Stick your right needle straight down the throats of the next two sts on your left needle, as if you were starting to purl two together - but have the tip of the right needle come out in the back. Knit the two stitches together from this position.
In untwisted knitting, this is your least desirable option, because the base of the two stitches that you just worked together will be twisted, and will stand out from all your other stitches. If, however, you are working a twisted stitch pattern, then this is the ideal left-leaning decrease for that, as it maintains the stitch pattern.

There you go, single decrease stitches worked from the knit side. Enjoy!
No comments:
Post a Comment