Monday, June 23, 2008

Kiwi Knits Blog Contest


The first of July is the official one-year anniversary of this blog! For me the year has passed really quickly. There have been times when I have had to scratch my head a bit to think of what to post about next, and many more times when I've had too much to say to fit it all into one post. I've posted about things that I have encountered in the projects I'm working on, about questions on techniques that I am hearing from my private lesson students, and things that are new to the shop. In the end, what I hope to provide you with in this blog is not only information about what is happening at Kiwi Knitting Co., but also hints to help you become better and more confident knitters. There are some rules in knitting that are 'What ever works for you and gets the job done', and some rules that are carved in stone in order to make a certain thing happen in a certain way. I hope I have helped you to understand the process better, and to grow as a knitter.

In turn, Lynn and I want to thank you for making the first year of the blog so successful! Last I looked, we had over 8000 hits on the blog in the last year. One of the blog posts (on The Afterthought Pocket) was used as a reference by the Mistress of knitting blogs, the Yarn Harlot herself. I thank you all for being such faithful and devoted readers, and for all the great feedback you give Lynn and myself on what you see here.

So, how do we thank you, and make it fun at the same time? We're having a contest! A little quiz, if you like. Here is all you need to do- Download and print out the quiz sheet by following the link at the bottom of this blog post. Answer the quiz questions - remember, this is an open-blog test! Some of the questions are a piece of cake, some you can find the answers to in previous blog posts. Fill out the answer sheet, and bring it into Kiwi anytime between July 7th & 31st. Be sure to add your name and phone number on your answer sheet. All entries must be handed in to Kiwi Knitting by close of business on Thursday, July 31st.

On Saturday, August 2nd, Lynn will draw a prize winner from among the entries that had all the questions answered correctly. You don't need to be present in order to win the prize, but you are welcome to stop into the shop and see who wins!

And what do you win? Do you see that gorgeous Della Q knitting bag up at the top of the page? That could be yours. Along with the $30.00 gift certificate to spend on a project to fill the bag with, and a one-hour private lesson with me, Lynda Sorenson, on anything knitting or crochet related that you care to bring to the table. Altogether, this package is worth $98.00! That's how much we appreciate you!(Actually, we appreciate you a whole lot more than that, even!)

Now the neat thing, is that everyone who enters gets a little something, whether you win the big prize or not. On the day that you bring in your completed entry form, you can get a 10% discount on any yarn purchase made that day. Now that is certainly worth going out during the daytime in Tucson's summer!

Keep in mind that Kiwi Knitting Co. will be closed for July 4th week, from Monday, June 30th through Sunday, July 6th, and will re-open on Monday, July 7th.

Here's a link to the quiz page. Thanks so much! And good luck!

Wednesday, June 18, 2008

Double Decreases

Just as a single-stitch decrease starts out with two stitches and ends up with one, a double decrease starts out with three stitches and ends up with one. I was trying to think of examples of when you might see these, such as lace patterns, garment shaping, etc, but really, they can be used just about anywhere in anything you knit. The first one, the Central Double Decrease (CDD) is used quite often in lace patterns to bring a set of stitches to a peak. In such a case it is usually preceded and followed by a yarn over, so that the pattern for that area might read, 'yo, cdd, yo' Also, if the pattern is trying to create a flow of stitches that work towards the center of a motif, this increase would not be covered on either side with a yo, and would result in a ridge or design line in the fabric. I also like to use this when working mitred or modular pieces, such as in the squares of my Stained Glass Bag design.

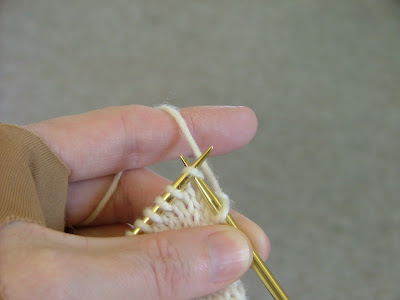
To work a CDD, slip two stitches together knitwise (remember my rule about slipping stitches when they are part of a decrease) and knit the third stitch.


With the tip of your left needle, grab the two slipped sts on your right needle, lift them up and over the knitted stitch, and drop them off of the needle.


The result is a decrease where the central stitch lies on top, as you can see just above and to the right of my thumb. Look just below my thumb, and see what happens when you stack these on top of each other for several rows.


Sometimes you want your double decreases to lean in one direction or the other. This is pretty simple, and the right leaning double decrease and the left leaning double decrease are worked almost exactly the same, except for the order in which you pass the slipped stitches over. They both start with a slip one, knit one. To make the stitch lean towards the right, you next pick up that slipped stitch, and bring it up and over the knit stitch and drop it off of the needle.


Now take the knit stitch, put it over onto the left needle, and take the next unworked left stitch and pass it up and over the knitted stitch, and drop it off.


To have a double decrease that leans towards the left, start the same way, Sl1, K1. But you will immediately put the knitted stitch over to the left needle, and pass the next unworked stitch on the left needle up and over the knitted stitch.


Put the knit stitch with its slipped stitch collar over to the right needle, and bring that first slipped stitch up and over the knitted stitch, dropping it off of the needle.


Here you can see the right leaning decrease as the rightmost of the two shown, and the left-leaning double decrease as the leftmost of the two double decreases shown.


Just a heads up for you all, but tantalizingly without any details yet! The beginning of July will be the one year anniversary for this blog! Lynn and I have some fun and surprises planned around this, and I'll be revealing them to you sometime before the end of June. Trust me, you will NOT want to miss this. I had the germ of an idea, but it is Lynn who has put all the trimmings on the turkey, as it were. Keep your eyes glued here...

Tuesday, June 10, 2008

Knit Side Decreases

Well, what better way to follow increases than with decreases? Today I'll show you knit-side, single stitch decreases. Next time we'll talk about knit-side double decreases, and then later I'll show you purl side decreases.

Okay, now get your yarn and needles in hand, and pay attention. I'm going to give you some Decrease Rules.

Rule #1- The principal thing to remember about decreases of any kind is - and you can tattoo this on your forehead - Whichever stitch the right needle enters first when you are doing a decrease, is the stitch that ends up on top of the pile when the decrease is finished. Think about it - you are taking 2 or 3 stitches and making them into one. Only one stitch of those 2 or three can be on top, the others have to be in the middle or on the bottom. The stitch that the right needle enters first is the stitch that ends up on top. This decides which way the decrease leans.

Rule #2 - When slipping stitches as part of a decrease, the stitches are ALWAYS slipped as if to knit. Otherwise there is just no darned point in slipping them. You want to change the orientation of the stitch legs before you work the decrease in order to have the stitches not be twisted when the decrease is finished. Take a look back at the slipped stitches post here to see in detail why and how that looks.

Now, I am also going to tell you this- NO MATTER what your pattern says, if you are doing a knit decrease on the right hand edge of your fabric, do an SSK. I've seen many patterns that tell you to do a K2tog (Wrong!) or a K2tog tbl (not pretty unless you are working a twisted stitch pattern!). What you want is a decrease that will cause the stitches to lean from the outer right edge towards the center of your fabric, and SSK is the best way to make it happen.

Many times, pattern writers and editors will do what I call 'dumbing a pattern down'. In other words, they want to make it as simple as possible for as many knitters as possible. I don't ever hold with that theory. If you don't ever challenge knitters to learn something new by putting the proper technique into the pattern, then they will never learn something new. So tattoo this on your right hand - SSK - Slip, Slip, Knit

Slip one stitch as if to knit, slip a second stitch as if to knit


Put your left needle straight down their little throats and have it come out in the front. See how this puts your needles into knitting position? See how putting your right needle into the right stitch first will make that one land on top? Knit the two stitches together from this position.


On the left edge of your fabric, to get a decrease stitch that will lean towards the right - into the center of your fabric, simply knit two stitches together as if they were one stitch - K2tog. You could tattoo this on your left hand, if you are so inclined.


Here is how the finished SSK looks. Notice that the right stitch is on top, making the pair lean towards the left, away from the right edge. (second stitch in from the edge, 4th row down)


And here is how the K2tog looks. Notice that the left stitch - the one the right needle entered first - is on top and the stitch leans towards the right. (second stitch in from the edge, 3rd row down)


Now there are a couple of other ways to get a left-leaning decrease aside from the SSK. The first one here is a bit more old-fashioned, you'll see it more in older patterns. This is a Sl1, K1, psso. Slip one stitch as if to knit, knit the next stitch.


With the tip of your left needle, pick up the slipped stitch - the second one in - on your right needle, lift it up and over the knitted stitch, and drop it off the needle, just as you do when you are binding off. Slip 1, Knit 1, Pass Slipped Stitch Over. Because that dropped off stitch was slipped without being worked, it is slightly longer than the stitches around it, and so the result is less elegant.


The other left leaning decrease is a K2tog tbl, or Knit 2 Together Through the Back of the Loop. Stick your right needle straight down the throats of the next two sts on your left needle, as if you were starting to purl two together - but have the tip of the right needle come out in the back. Knit the two stitches together from this position.

In untwisted knitting, this is your least desirable option, because the base of the two stitches that you just worked together will be twisted, and will stand out from all your other stitches. If, however, you are working a twisted stitch pattern, then this is the ideal left-leaning decrease for that, as it maintains the stitch pattern.


There you go, single decrease stitches worked from the knit side. Enjoy!

Monday, June 2, 2008

Just When You Thought the Increases Were Over

You probably thought I had run the gamut with increases for knitting. But as in the old saying, 'There is more than one way to skin a cat', there are probably more ways to do increases even that I will have shown you here. I'll finish up talking about increases with two that are not commonly seen or used, but handy to know, nonetheless.

The first of these is called a Median increase. To work it on the right edge of the fabric, knit as usual into the stitch to be increased, but don't remove the original stitch from the left needle. Then take the tip of your right needle, poke it into the stitch one row below that stitch on your left needle from front to back. Knit into it, and drop the stitch on your left needle off. It will look something like this-


To work the same increase on the left edge of your fabric, put th etip of your right needle into the stitch one row below the next stitch on your left needle, and knit into it. Now knit into the stitch that is on the left needle, and drop it off.


The results on the right leave a tiny hole.


The results on the left look beautiful.


The next increases are worked right on the edge of the fabric. To work a Right Edge increase, knit the first stitch on the needle.


Then take the tip of the left needle, and coming from back to front, pick up the left leg of the stitch one row below the stitch on your right needle that you have just knitted. Knit this loop through the back of the stitch.


To work the increase on the left edge, work until you have just one stitch left on the left needle. Put the left needle into the stitch one row below this last stitch. It's a little tricky, but can be done. Now knit that loop through the front leg as normal, and then knit the last stitch on the needle.


Here are the results on the right, you can see the little jut out where the increase was made.


And on the left...


I was a bit under the weather last week, and was doing more reading that knitting - in one day I finished one book and read two others! But today I sent off my second pair of death socks in the Sock Wars contest. After killing my first target, she sent me the socks-in-progress she had been working on for her target. My task was then to finish that pair and kill her target as well. But when her SIPs arrived they were scented, and I wasn't able to work on them. Luckily I was allowed to substitute another yarn, and so I had to start all over with that pair. Lynn was kind enough to donate to me another ball of the Online Supersocke 100 sock yarn, this time in a beautiful orange color. I'm not normally an orange person, but I really loved this color, it reminded me of sweet potatoes! So here is the evidence of my second kill, winging their way to my next target even as we speak. I understand that Bridget is also taking part in Sock Wars, and I look forward to hearing how she is faring.